Mounting a 3" drive on a
PC
Success at last! I have postponed fitting a 3" drive to a PC for a long
time. Stories of disaster (burned 3" drives and destroyed PC floppy drive
controllers) and confusing and conflicting information all around have
kept me from this task but, since I received the DSK disk image of a CF2
format for the JOYCE emulator (I already used CF2DD disk images) and I
got the emulator to work with actual disc-drives, I have been wanting to
connect one desperately. I must have been, because my PC did gave me a
lot of strange problems and actually blew one 3" drive to limbo…
I therefore repeat the statements already made in the disclaimer: any
damage to your computer is your responsibility, not mine. I only present
the conditions under which I have been able to get it working - I cannot
guarantee similar results on your PC. Having said that, I am always willing
to assist in case of questions. Also note that this is the second version
of this document - I am still working on it and will also investigate whether
a 3" CF2 disc drive (40 tracks single sided) will work on a PC.
First of all the requirements: I used a CF2DD 720kb (80 tracks, double
sided, double density) disc drive from a PCW 8512, the Amstrad FDC (short
for: floppy drive controller) cable and a spare male Shugart 5.25" connector.
The PC used is a Pentium 233mHz with an Award Modular BIOS 1998, version
4.51PG, running Windows 95 with (at least) one 3.5" power connector and
one 5.25" Shugart female FDC connector available. Other details do not
matter, though you should consider performance if you want to use the JOYCE
emulator from John Elliott (see further on) and a BIOS that supports double
density (720kb) drives. For safety reasons I have also used a power supply
separate from the computers power supply but, if all goes well, this is
not required. The software used is 22DISK (Sydex - shareware), MS Odball
and the JOYCE emulator (the latter two by John Elliott). Be sure to have
a copy of at least one of these programs available (check below) plus at
least two CF2DD disks formatted on the 3" with some data on them (written
by the PCW - do not use originals).
Actions to be taken:
-
Create a conversion cable according to the schedule and the picture.
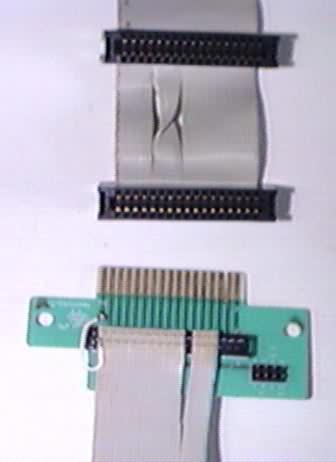
Notes on the picture on the right: the cable on the top is a PC FDC
cable with two female 5.25" Shugart connectors. Note the "twist" in the
cable: do not use the bottom one (after the twist) but the upper one (before
the twist in the cable).
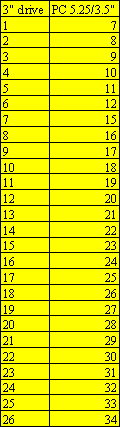
The lower cable is the Amstrad FDC cable split according to the schedule
on the right. Number 1 (the blue coloured cable) is on the right side and
numbering ascends from right to the left. The connector attached is a 5.25"
male Shugart connector that can easily be obtained.
Do note a potential pitfall: usually these 5.25" connectors come with
a jumper block (shown on the lower right of the Shugart) that connect data
lines according to the settings of the jumpers. I have bypassed this by
connecting pin 34 (PC numbering) to data line 34: this is the white wire
welded on the left side of the connector. When in doubt use a VU meter
on the (disconnected) cable to test whether the PCW input does come out
of the proper PC output lines!
-
Familiarise yourself with the parameters of the PC and the Basic Input/Output
System BIOS. Create a back-up and hard copy the system and BIOS parameters
of the computer;
-
Switch off and disconnect the PC. Open it and familiarise yourself with
the internals of the computer. Locate the FDC cable and the power cables
of the floppy drives. Disconnect all available floppy drives (data and
power);
-
Observe the FDC controller cable and locate the "twist" in the cable, in
case of doubt: refer to the picture of the data cable shown under item
1). Use the connector before the twist in the cable;
-
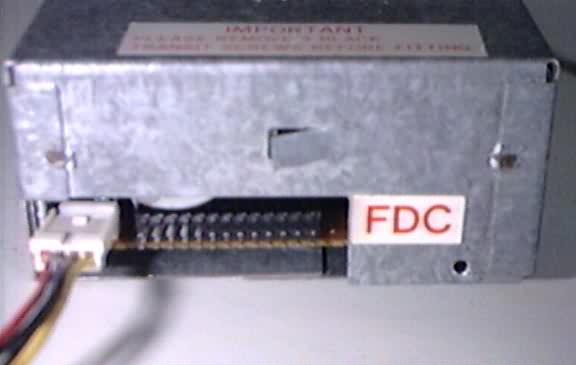
Take the 3" drive and connect the power THE OTHER WAY AROUND. Use brute
force or remove the plastic shield on the power connector of the 3": refer
to the picture and observe that the power DOES go in the other way! Amstrad
switched the default connections of 5 and 12 volts!
-
Connect the data cable (when using the picture above, the blue coloured
line 1 of the Amstrad FDC cable should be on the left side). Normally a
Shugart connector plugs in one-way only: if not, check for the colour tags
on the respective data lines 1.
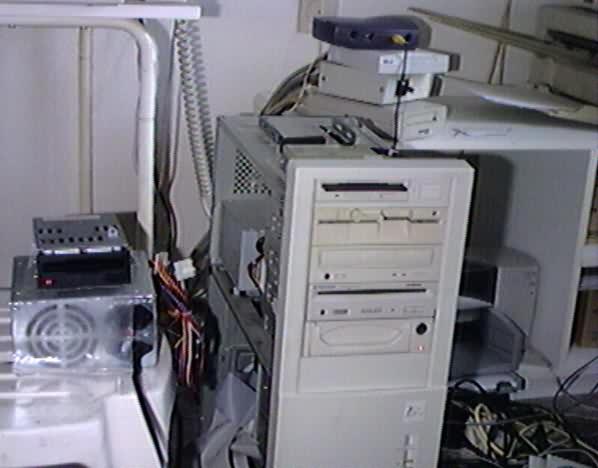
The picture shows my successful test set-up: the 3" drive next to my
Pentium on top of a separate power supply. Always switch on the power supply
of the 3" drive first: the resulting bright light from the LED will diminish
when the PC is powered-on.
-
Switch on the PC and immediately enter the BIOS (press [DEL] on my BIOS):
do not allow Windows to start just yet. Change the following BIOS settings
when required:
Standard CMOS set-up: no A drive, B drive 720kb, 3.5" type (I found
360kb, 5.25" type to work as well - later on);
BIOS features set-up: Swap floppy drive DISABLED, Boot up floppy seek
ENABLED, Halt on ALL ERRORS.
Do note the floppy seek feature in combination with halt on all errors:
if for some reason the computer does not accept the drive these settings
will not allow Windows to start and you can re-enter the BIOS immediately.
This will save a lot of time, as I have found out;
-
Save and exit the BIOS. The PC should now start and accept the drive, that
is: Windows should start. If it halts with a floppy drive failure (probably
no. 40 - that one came up on my screen lots of times) check the BIOS settings
and the hardware connectors. Continuing with the error is potentially dangerous
and serves no purpose anyway. I have experienced some strange behaviour
of the PC in this respect. It cost me a 3" drive (short circuited while
the power connection was OK?). But in the end it worked out, with the same
settings, except that I disconnected all other floppy drives. I cannot
reproduce what exactly went wrong (have no intention to as well!);
-
Check the result by starting My Computer/Windows Explorer or something
similar. If Windows reports the drive, check it's details.
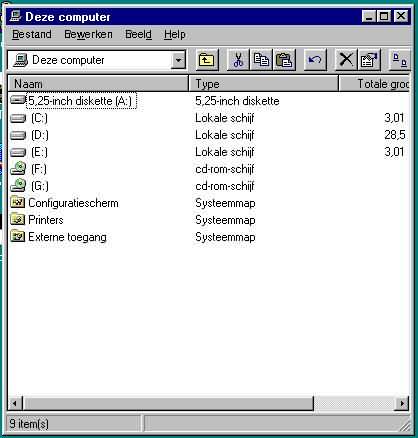
Note that my computer presented false information (still does). Disregard
the Dutch language, but the screen dump evidences that the PC is identifying
the 3" as drive A being a 5.25" disc drive. The BIOS settings are 3.5"
drive B with no swapping allowed! I am not sure what happened but it does
work as drive B (A malfunctions!), so…
-
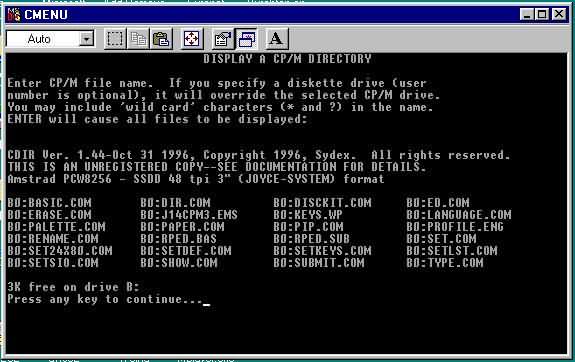
Start 22DISK, set it to CF2DD for drive B and request a directory listing.
Ignore data errors by continuously retrying or ignoring the error. Error
messages like "controller does not respond" and "drive not ready" do point
to an error in the connection (or you may have addressed the wrong drive
letter!) but data errors appeared with my PC (again: no guarantee on the
behaviour of your PC) initially. As long as it does refer to sectors you
do have a connection. And, all of a sudden the errors disappeared and the
same 3" disk that caused data errors now works fine! I already mentioned
that I experienced some strange behaviour of the PC. Regarding the message
in the picture: I do have a license for 22DISK usage but still use the
shareware set-up.
-
In order to read a CF2 (single sided format) you would have to download
and install the EURO.DEF file (see below), and, using these definitions,
the CF2 format is not a problem as well.
Putting the 3" drive to good use:
At present there are four programs I would recommend to use in connection
with a 3" drive on a PC.
-
The downloadable shareware program 22DISK
(Sydex) and the expanded definitions file EURO.DEF.
This EURO.DEF is freeware (credits to: H. Jungkunz): you need it only if
you want to read CF2 besides the standard CF2DD format as supplied with
22DISK. It also contains other useful Amstrad disk formats (CPC's). All
you have to do is to edit a copy of CPMDISKS.DEF, add the contents of EURO.DEF,
remove the unwanted definitions and recompile it using GENINDEX. My version
of EURO1.ZIP is zipped and includes most of his
formats and the superformats XF2DD and SF2DD. Consult the manual - be sure
not to use an older version than v1.44, otherwise you may run into problems
with Windows!
22DISK can copy files from and to the 3" disk (CP/M to DOS and vice-versa:
CP/M users or groups and DOS directories supported). LocoScript documents
would need conversion to ASCII on the PCW prior to reading the disk on
the PC. The LocoScript format on the PC is useless unless you have some
sort of LocoScript for the PC or a conversion program (e.g. AILINK)! Other
files, like dBase, SuperCalc, MicroDesign, WordStar, Protext and the like,
should work without conversion on their DOS counterparts. Many Windows
programs also offer some sort of import functionality for data from older
software: do test this…
-
The famous downloadable MSODBALL
program from John Elliott (opens in a new window): runs on both PCW's as
well as PC's! Same functionality as 22DISK, except for the formatting (which
I do NOT recommend to use: may result in writing problems on the PCW!)
and the flexibility in disk formats. MS Odball handles CF2DD. Best choice
though, if you are looking for a good, free program that runs on both computers!
-
Again by John Elliott; the JOYCE emulator for the PC. This emulator has
IMPORT and EXPORT utilities for exchange with the MS Dos environment, supports
MS Dos directories and limited direct communication with the actual disc
drives (slow but it works). Plus: a PCWTRANS.EXE utility that creates DSK
disk images from CF2DD disks. The program is free - but you do need 3.5"
bootable disks for the PCW 8000 range and these are subject to copyright
(contact either SD Systems or LocoMotive Software)! However, I consider
this program the best of them all: perfect emulation of LocoScript and
CP/M on the PC as well as versatile exchange possibilities! A Linux version
is available too. See the URL under item 2).
Do note that JOYCE needs a lot more than a Z80 on 4mHz! I use it on
a Pentium 233mHz, 64mb memory and that works fine. Consult the documentation
from John Elliott. Also note that, although the actual disc-drive may be
used you need to add a statement like SET H.DSK=DISC:1 to your C:\AUTOEXEC.BAT
in order to allow the 3" to be used by JOYCE as drive H. Drive letters
A and B are reserved for the emulator "drive" facilities: this may cause
problems with some programs that expect to be run from A, B or M only.
-
A program originally meant for the CPC emulator CPDRead
(opens in a new window: the URL points to the Amstrad FAQ in English: locate
the proper link). CPDRead can read copy protected disks and less common
disk formats on the PCW (e.g. 168 Track, XF2 and SF2) and create DSK disk
images. Unfortunately the JOYCE emulator cannot read the extended DSK format
from CPDRead, but there is work-around.
Of course, there are other programs around that also work with a 3" drive
on a Personal Computer, but these are definitely the best and can be downloaded
too!
Back to the home page